
Trew Landscape Blog
Christmas Light Installation Safety: A Homeowner's Checklist
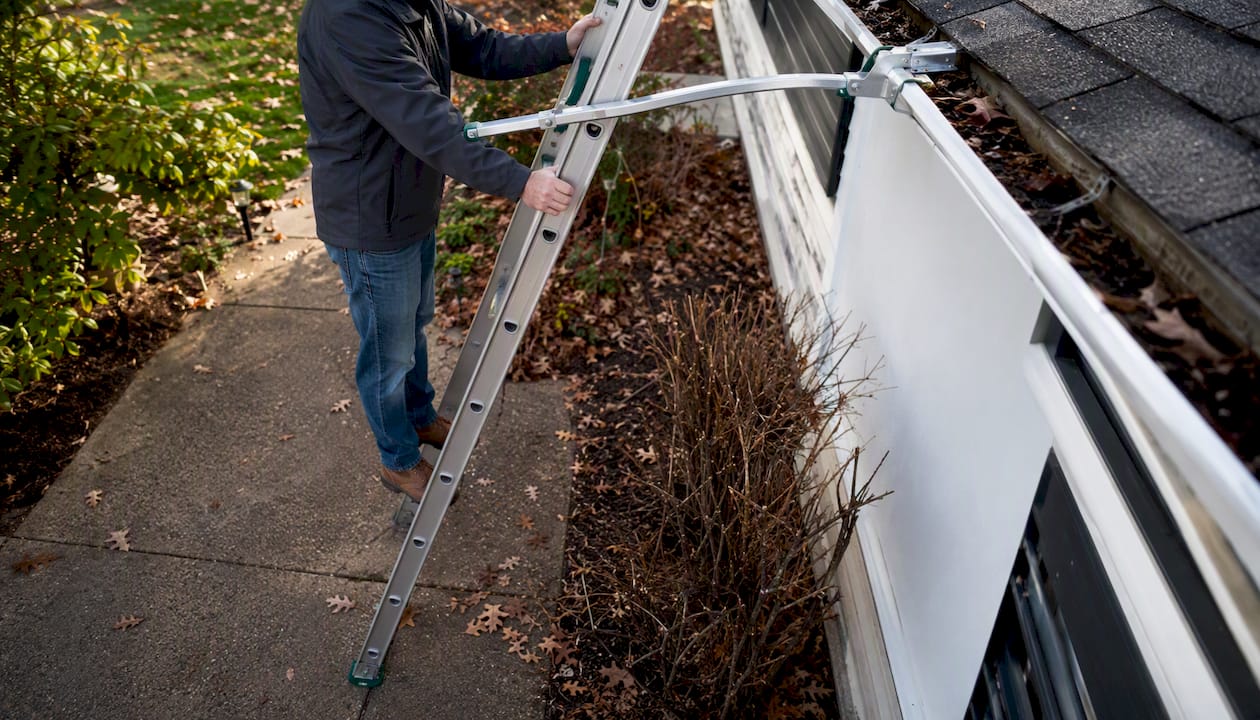
Christmas Light Installation Safety: A Homeowner's Checklist ! Ladder with stabilizer set up on gutter Follow four rules and you'll avoid the vast majority of holiday lighting injuries and fires: inspect every strand before you plug it in, power everything through a GFCI-protected outlet, set up ladders using the 4:1 rule with a 3-foot extension above the roofline, and take temporary lights down within 90 days.
Christmas Light Installation Safety: A Homeowner’s Checklist
Follow four rules and you’ll avoid the vast majority of holiday lighting injuries and fires: inspect every strand before you plug it in, power everything through a GFCI-protected outlet, set up ladders using the 4:1 rule with a 3-foot extension above the roofline, and take temporary lights down within 90 days. Christmas light installation safety comes down to preparation more than luck.
- Never daisy-chain extension cords or power taps. Plug each one into a permanent receptacle.
- Test your GFCI outlet before you plug in a single strand.
- Follow ladder setup rules from the National Electrical Code (NEC) and NFPA 1 covering both electrical and fall hazards.
- Remove temporary lighting within 90 days, per NEC 590.3(B) and NFPA 1.
Pro Tip: If your display requires roof access above 6 feet or work near power lines, stop and call a licensed installer instead of improvising.
Key Takeaways
Safe holiday lighting depends on GFCI protection, correct ladder setup, inspected cords, and removal within the 90-day temporary-installation window set by NEC and NFPA.
| Point | Details |
|---|---|
| Inspect before you plug in | Discard any strand with frayed wire, cracked sockets, or loose bulbs before installation. |
| Use GFCI protection | Plug all outdoor lighting into a GFCI outlet and test it before and during the display’s run. |
| Follow ladder rules | Use the 4:1 base ratio and extend the ladder 3 feet above the landing point. |
| Never daisy-chain cords | Plug each extension cord or power tap into a permanent receptacle, not another cord. |
| Remove within 90 days | NEC and NFPA cap temporary holiday lighting at 90 days from installation. |
| Hire a pro for high-risk jobs | Trew Landscape LLC’s Christmas light installation service handles roof-height, power-line, and hardwiring risks safely. |
Table of Contents
- Christmas Lights Safety Checklist You Can Print Today
- Inspecting Lights and Cords Before You Plug In
- Ladder Setup and Fall Prevention on Roofs and Gutters
- GFCI Protection, Circuit Loads, and Extension Cord Rules
- Securing and Routing Cords Without Damaging Your Home
- Removal Timing, Storage, and Seasonal Maintenance
- When to Call a Professional Instead of DIY
- Common Mistakes and Fast Fixes
- What the Codes and Safety Data Actually Say
- Keeping Kids and Pets Safe Around Your Display
- Installing Lights Safely in Rain, Snow, or Freezing Temperatures
- How to Test Your GFCI Outlet the Right Way
- Staying Clear of Overhead Power Lines
- Why Safety Comes Before Extra Sparkle
- Skip the Ladder: Professional Holiday Lighting in Kansas City
- Sources
- FAQ
Christmas Lights Safety Checklist You Can Print Today
Tape this to your ladder or tuck it in the storage bin with your lights.
- Inspect every strand for cracked sockets, bare wires, or loose bulbs.
- Confirm the lights carry an outdoor rating and a UL, ETL, or CSA listing.
- Test the GFCI outlet before plugging anything in.
- Set the ladder using the 4:1 rule, extended 3 feet past the roofline.
- Check your total amp draw against the circuit’s rated capacity.
- Clip cords with plastic fasteners, never nails or staples.
- Turn lights off at night or set a timer.
Pro Tip: Measure your rooflines and pre-clip your strings on the ground before you climb. Fewer trips up the ladder means fewer chances to fall.
Inspecting Lights and Cords Before You Plug In
Old strands hide problems that aren’t obvious until they fail. Run your hand along every cord and check for cracked insulation, scorched sockets, bent prongs, and bulbs that wiggle loose in their housing. The Consumer Product Safety Commission recommends inspecting lights every season and discarding any strand with visible damage rather than patching it with electrical tape.
Check the tag for a UL, ETL, or CSA listing, and confirm it says “outdoor rated.” Indoor-only strands aren’t built to handle moisture or temperature swings, and using them outside is one of the fastest ways to create a short.
- Discard strands with cracked sockets or exposed copper wire.
- Confirm outdoor-rated cords and connectors, not indoor-only versions.
- Match your extension cord’s amp rating to the load you’re plugging in.
- Keep a pair of insulated gloves and safety glasses on hand for handling clips and wiring.
Pro Tip: Buy one extra outdoor extension cord rated for a higher amperage than you think you need. It’s cheaper than a repair call.
Ladder Setup and Fall Prevention on Roofs and Gutters
Falls, not shocks, send more people to the emergency room during light installation season, which is exactly why ladder setup deserves as much attention as the wiring itself.
- Choose a nonconductive ladder made of fiberglass or wood, never aluminum, for any work near power sources.
- Set the base using the 4:1 rule: for every 4 feet of height, move the base 1 foot away from the wall.
- Extend the ladder at least 3 feet above the point where you’ll step off, per Ohio State University Extension’s holiday lighting guidance.
- Maintain three points of contact at all times and have a spotter hold the base.
- Check ground conditions and skip the climb entirely if the ladder feet won’t sit flat and stable.
OSHA’s construction fall-protection standards generally kick in at 6 feet of height, a useful benchmark for deciding when a harness, or a professional crew, makes more sense than a stepladder.
Pro Tip: A standoff stabilizer that holds the ladder off the gutter protects both you and your gutter from damage.
GFCI Protection, Circuit Loads, and Extension Cord Rules
Every outdoor strand should run through a Ground Fault Circuit Interrupter outlet. GFCIs cut power the instant they detect a current leak, which is often the difference between a tripped breaker and a serious shock. ESFI recommends testing the GFCI’s button before you plug anything in, and again partway through your display’s run, since outdoor units can fail from cold or moisture over a season.
Daisy-chaining extension cords, or plugging one power strip into another, is one of the most common causes of overheated wiring. Every cord and power tap needs to run to a permanent, in-wall receptacle. NFPA guidance backs this up directly:
Extension cords must be in good condition, free of splices, not routed through doors or under flooring, and never permanently affixed to a structure.
Add up the amp draw of everything you’re running and stay under 80% of your circuit’s rated capacity. Most manufacturers print a maximum strand-connection limit right on the tag, and going past it is a common cause of overheating even when the total amperage looks fine on paper.
- Use only GFCI-protected outlets, or a portable GFCI adapter if a permanent one isn’t available.
- Never plug an extension cord into another extension cord.
- Seal every outdoor connection with a weatherproof cover or dielectric grease.
Pro Tip: Avoid male-to-male adapters entirely. They bypass the safety design of a standard plug and are a known shock hazard.
Securing and Routing Cords Without Damaging Your Home
How you attach and route your lights matters almost as much as the lights themselves. Piercing a cord’s insulation with a staple or nail creates a hidden short that can smolder for weeks before anyone notices.
- Attach strands with plastic clips designed for gutters, shingles, or siding.
- Route cords away from doorways, windows, and any path a lawnmower or snowblower might cross.
- Keep every plug connection elevated off the ground, away from puddles and snowmelt.
- Don’t staple or nail through any cord, ever.
- Don’t run cords under doors, rugs, or flooring.
- Don’t cover connections with tarps or plastic that trap heat and moisture.
Pro Tip: Group connections at a single, elevated junction box near an outlet instead of scattering plugs around the yard. It’s easier to inspect and easier to weatherproof.
Removal Timing, Storage, and Seasonal Maintenance
Temporary holiday lighting has a hard deadline. Both the National Electrical Code and NFPA 1 cap temporary installations at 90 days, which for most homeowners means lights go up around Thanksgiving and come down well before Valentine’s Day.
- Mark your removal date on a calendar the day you hang your lights.
- Cut power at the breaker or outlet before you touch any strand for removal.
- Work in daylight with a spotter, and skip the job if the roof is wet or icy.
- Coil strands loosely around a spool or cardboard core, never in a tight ball.
- Store in labeled bins and test each strand before you pack it away for next year.
Pro Tip: Test every strand before storage, not after you pull it out next November. A bad strand is easier to replace in January than diagnose in a rush next fall.
Nearly one-third of home Christmas tree fires trace back to electrical problems, and a lot of that starts with strands that got packed away damaged and never got checked.
When to Call a Professional Instead of DIY
Some jobs are worth handing off. If your display requires work above 6 feet, a steep or wet roofline, or any point near overhead power lines, that’s the moment to stop climbing and start dialing.
- Roof pitches steeper than a walkable slope, or any second-story eave work.
- Proximity to overhead power lines or utility drops.
- Displays requiring hardwiring, dedicated circuits, or high-load commercial setups.
- Any situation where you don’t have a spotter or the right ladder for the job.
A licensed installer brings load calculations, GFCI testing, and fall-arrest equipment as part of the job, not an afterthought. Trew Landscape LLC’s Christmas light installation service handles exactly this kind of work for Kansas City homeowners who want a display without the ladder risk.
Pro Tip: If you’re already paying for a fall-arrest harness or a second ladder just for this one job, the math usually favors hiring it out.
Common Mistakes and Fast Fixes
Most light-related incidents trace back to the same handful of shortcuts.
- Frayed cord: Replace the strand. Electrical tape is not a repair.
- Overloaded outlet: Move half the load to a different circuit rather than adding another power strip.
- Cracked socket or missing bulb: Discard the entire strand; don’t run it “one more year.”
- Lights left on unattended: Add a timer or smart plug so nothing runs while you sleep or travel.
Always cut power at the outlet before you touch a strand for repair or removal.
What the Codes and Safety Data Actually Say
The rules governing holiday lighting aren’t guesswork. NEC section 590.3(B) and NFPA 1 section 11.1.6.3.2 both cap temporary holiday lighting at 90 days, and NFPA’s broader guidance on cords and power taps applies the same way to a single porch strand as it does to a commercial display.
Nearly one-third of home Christmas tree fires start with an electrical problem, according to USFA/FEMA fire data, which is exactly why inspection matters more than decoration budget.
The ESFI and CPSC both reinforce the same three habits: GFCI protection, outdoor-rated cords, and annual inspection. Test your GFCI, respect the manufacturer’s strand limit, and have any permanent wiring work done by a licensed electrician rather than improvised.
Keeping Kids and Pets Safe Around Your Display
A light display that’s safe for adults isn’t automatically safe for a toddler or a curious dog. Small ornaments and bulb covers are choking hazards, and a chewed cord is a shock risk that most homeowners never think about until it happens.
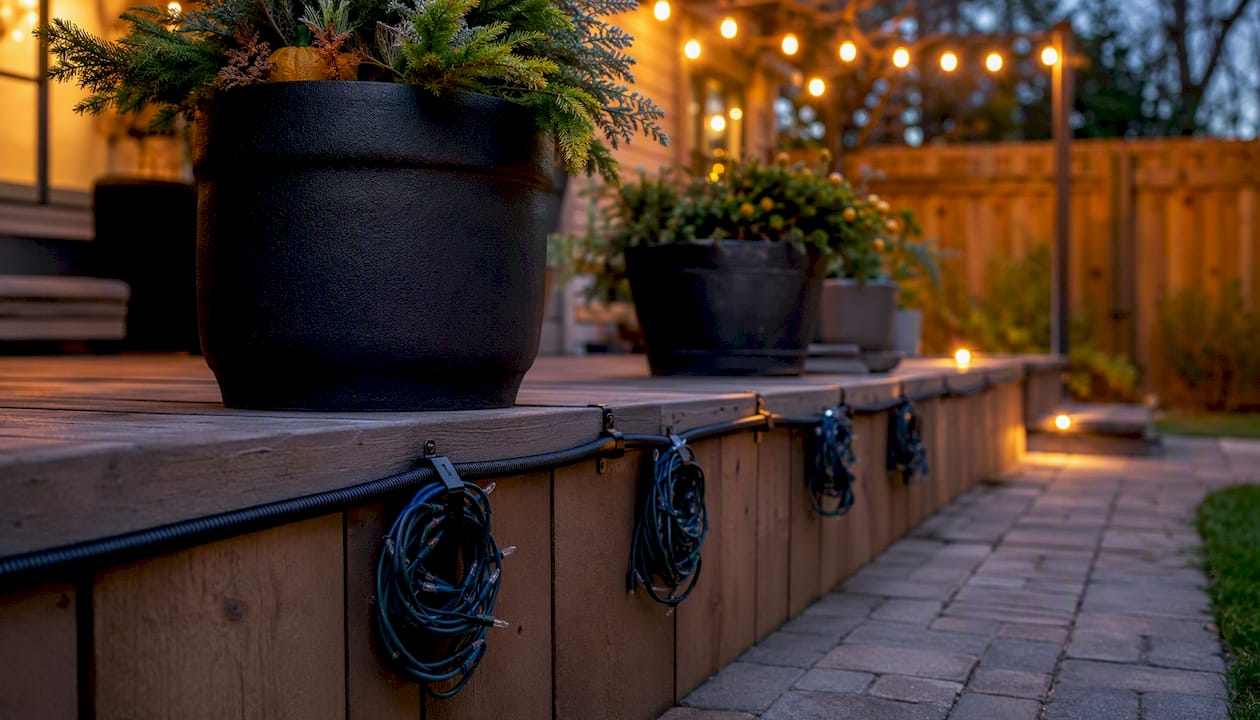
Route cords along walls and up out of reach rather than across open lawn or a patio where kids play. If you have a dog that likes to chew, run cords through split-loom tubing or PVC conduit at ground level. It’s a cheap fix that eliminates the risk entirely rather than just reducing it.
Keep breakable ornaments and any light with exposed wiring above the height a toddler can reach. Icicle lights and net lights draped low on shrubs are particularly tempting for a curious hand or paw, since the bulbs sit right at nose height for most dogs.
Watch for standing water near outdoor outlets, especially after rain or snowmelt, since that’s where a pet is most likely to make contact with a live connection. If your GFCI trips, that’s the system doing its job. Don’t just reset it and move on; unplug everything, check for water intrusion or damage, and only restore power once you’ve found the cause.
For families with young kids, consider battery-operated or low-voltage LED options for anything within arm’s reach, and save your GFCI-protected, higher-wattage strands for rooflines and areas out of reach.
Installing Lights Safely in Rain, Snow, or Freezing Temperatures
Weather changes the entire safety equation, and installing in the wrong conditions turns a routine job into a genuine hazard.
Wet ladder rungs and slick roof shingles are a leading cause of falls during holiday setup, so skip the job entirely if rain, snow, or frost is on the ground. Fiberglass and wood ladders lose grip fast when wet, and a roof that looks walkable when dry can be nearly impossible to stand on with a thin layer of ice.
Cold temperatures also affect the plastic housing on light strands and connectors, making them more brittle and more likely to crack when you handle them. Give lights time to acclimate if they’ve been stored in a cold garage, and handle connectors gently rather than forcing a stiff plug into an outlet.
Wind is an underrated risk too. Gusts above 20 to 25 mph make ladder work genuinely dangerous, since a sudden push can shift your balance before you can react. If your forecast shows wind advisories, wait a day.
The best installation window is a dry, calm afternoon with temperatures above freezing, ideally when the roof and gutters have had a few hours to dry out after any prior precipitation. If you’re installing in early winter in a region prone to sudden weather shifts, build in a buffer day rather than scheduling the job for the day before a storm rolls in.
How to Test Your GFCI Outlet the Right Way
A GFCI outlet only protects you if it’s actually working, and outdoor units fail more often than most homeowners realize, especially after a season sitting exposed to moisture and cold.
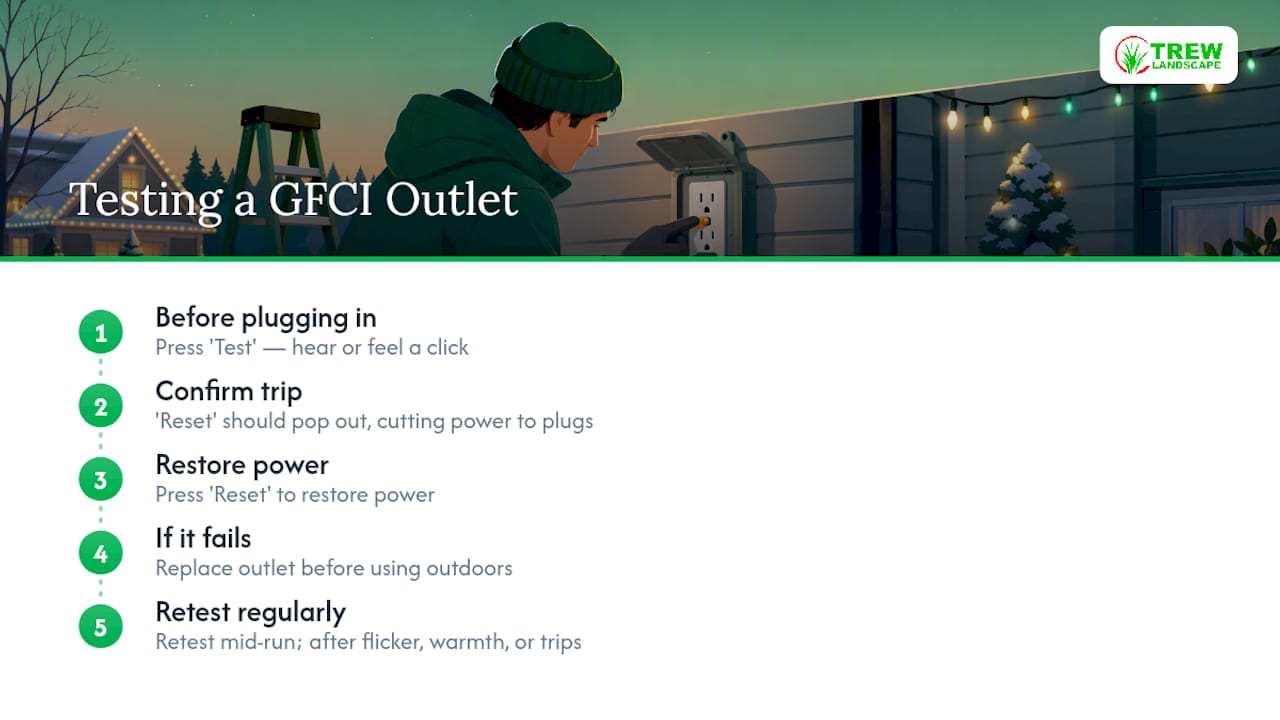
Before you plug in a single strand, press the “Test” button on the outlet. You should hear or feel a click, and the “Reset” button should pop out, cutting power to anything plugged in. Press “Reset” to restore power, and you’re good to proceed. If the test button doesn’t trip the circuit, or the reset button won’t hold, that outlet needs replacement before you use it for outdoor lighting.
Don’t stop at a single test before the season starts. ESFI recommends retesting partway through your display’s run, since cold weather and moisture intrusion can degrade a GFCI’s internal components over several weeks without any obvious external sign.
If your home doesn’t have a GFCI-protected outdoor outlet, a portable GFCI adapter that plugs into a standard outlet is a legitimate substitute. It performs the same function, tripping the circuit when it senses a current leak to ground, and it’s a worthwhile investment if you’re decorating a rental or an older home that hasn’t been updated.
Test again any time you notice flickering lights, a strand that feels warm to the touch, or an outlet that seems to trip more easily than usual. Those are early warning signs, not nuisances, and the GFCI doing its job is far better than the alternative.
Staying Clear of Overhead Power Lines
Overhead power lines carry enough voltage that even getting close, without touching anything, can be dangerous. This matters most for two-story homes, properties near a utility drop line, or any display involving an extension ladder near the roofline.
Before you set up a ladder anywhere near your roof’s edge, look up and trace where the utility line enters your house. Maintain a minimum clearance of 10 feet between any ladder, light strand, or piece of equipment and a power line, and never assume a line is insulated just because it’s covered in black or gray sheathing. Many are not.
Metal ladders are especially risky near power lines since they conduct electricity readily, which is one more reason fiberglass or wood is the better choice for any exterior work. If a tree branch near a power line needs trimming to run your lights, that’s a job for the utility company, not a homeowner with a pole saw.
If your property has a service drop that runs low across the yard or close to a rooftop workspace, treat that section of the house as off-limits for DIY installation. This is exactly the kind of red flag that should send you toward a professional crew instead of a ladder, since licensed installers carry the training and insurance to work safely in that zone.
Why Safety Comes Before Extra Sparkle
We’d rather install a slightly simpler display the right way than a showstopper that cuts corners on wiring or ladder setup. Every service call we’ve avoided traces back to a GFCI test, a properly rated cord, or a ladder set up correctly the first time.
Code-compliant installation isn’t the flashy part of the job, but it’s the part that keeps a display lit and safe through the whole season instead of tripping breakers by mid-December.
Skip the Ladder: Professional Holiday Lighting in Kansas City
If everything above sounds like a lot to manage on a cold weekend, that’s the point where hiring it out starts making sense. Trew Landscape LLC’s seasonal crews handle the whole job: GFCI testing, load calculations, weatherproof connections, and licensed electrical work for any hardwiring your display needs.

You get a display that’s up on time, code-compliant, and built to survive a Kansas City winter without a mid-season repair call. Our Christmas light installation service covers everything from a simple rooftop outline to a full property display, and our crews carry the same fall-protection and electrical training you’d want on any other exterior project. If you’d rather compare it against a permanent option, our landscape lighting service is worth a look too.
Request a free estimate and we’ll walk your property, flag anything that needs a licensed electrician, and quote a display that fits your home before the season gets away from you.
Sources
- AEX-591-79: Holiday Lighting Safety (Ohio State University Extension)
- In The Right Light - Decorate Your Home Safely During The Holidays (ESFI)
- Holiday Fire Safety (USFA/FEMA)
- Holiday Safety (CPSC)
Test your GFCI before every use and review the NFPA and NEC references above before planning a more complex or multi-story display.
FAQ
How do I install Christmas lights on a house safely?
Inspect every strand, use outdoor-rated cords, plug into a GFCI-protected outlet, and set your ladder using the 4:1 rule with a 3-foot extension above the roofline.
How much do professionals typically charge to install Christmas lights?
Pricing varies by home size, roofline complexity, and display scope; Trew Landscape LLC provides a free estimate based on your specific property.
Is it safe to leave LED Christmas lights on all night?
LEDs run cooler than incandescent bulbs, but leaving any display unattended overnight is best avoided; use a timer or smart plug so lights shut off automatically.
What are the main safety precautions for Christmas light bulbs?
Check for outdoor ratings and a UL, ETL, or CSA listing, discard any bulb with a cracked socket, and never mix damaged strands with new ones on the same circuit.
How long can holiday lights legally stay up?
NEC section 590.3(B) and NFPA 1 both classify holiday lighting as temporary wiring, capped at 90 days from installation.