
Trew Landscape Blog
Concrete Steps Design: Ideas, Dimensions, and Finishes
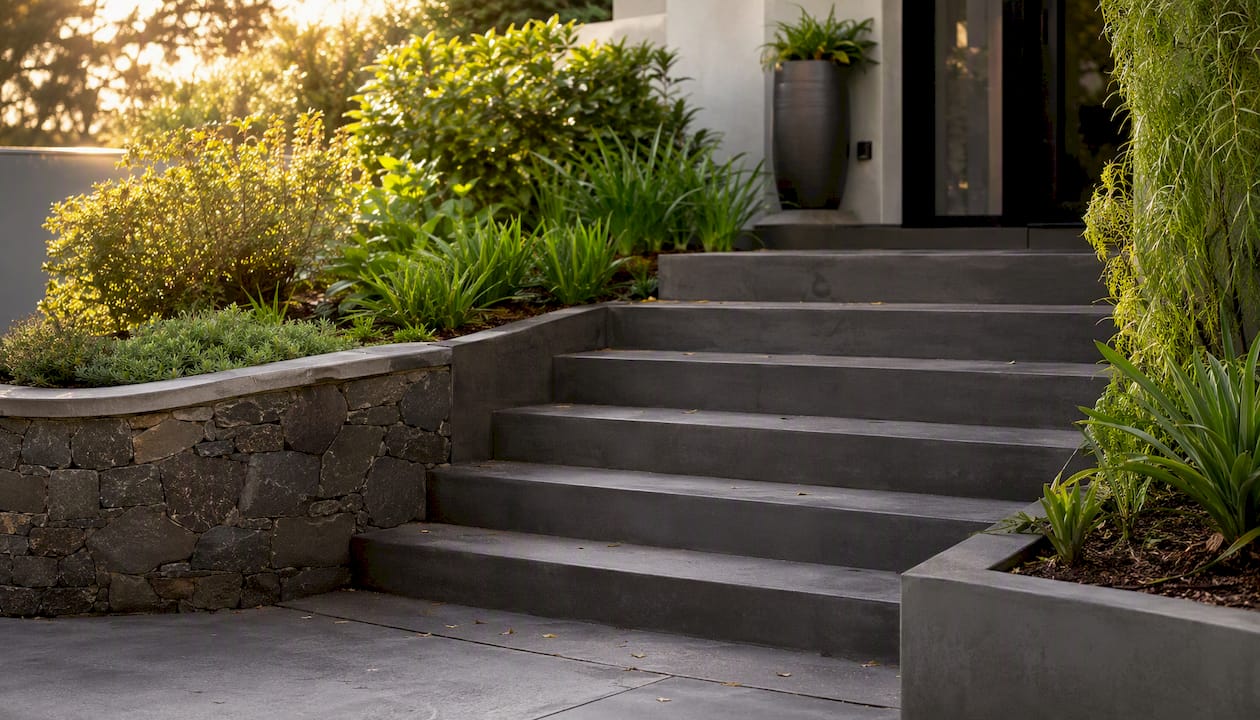
Concrete Steps Design: Ideas, Dimensions, and Finishes ! Modern cast-in-place concrete steps with planter Great concrete steps design comes down to three things done right: consistent geometry, a slip-resistant finish matched to the setting, and drainage that keeps water off the tread surface.
Concrete Steps Design: Ideas, Dimensions, and Finishes
Great concrete steps design comes down to three things done right: consistent geometry, a slip-resistant finish matched to the setting, and drainage that keeps water off the tread surface. Get all three right and the steps look sharp, stay safe, and hold up through decades of Kansas City freeze-thaw cycles. Miss one and you’re looking at repairs within five years.
Before you call a contractor, settle these three decisions:
- Style direction: traditional stacked front steps, modern monolithic slab, floating treads, curved form, or integrated planter steps
- Finish type: broom, exposed aggregate, stamped, stained, or polished concrete
- Construction method: cast-in-place poured concrete, precast units, or a hybrid concrete base with stone or porcelain treads
Key Takeaways
Concrete steps that last combine consistent geometry (3/8-inch maximum riser variation), a slip-resistant finish matched to the setting, and drainage slope built into every tread from the start.
| Point | Details |
|---|---|
| Riser consistency is critical | Code limits riser variation to 3/8 inch across a flight; exceeding it creates a serious trip hazard. |
| 7-inch riser, 11-inch tread | The 2R + T rule (2×7 + 11 = 25) produces a comfortable residential walking rhythm. |
| Finish drives outdoor safety | Broom, exposed aggregate, or salt finish outperforms smooth trowel for wet-tread traction. |
| Drainage slope is non-negotiable | A ¼-inch forward pitch per tread must be built into the form, not added after curing. |
| Trew Landscape LLC | Handles Kansas City concrete step projects from site survey through finish and lighting integration. |
Table of Contents
- What design styles work best for concrete steps?
- How do you choose the right concrete finish for steps?
- What safety dimensions and codes apply to concrete steps?
- How do you lay out concrete steps correctly?
- Cast-in-place vs. precast: which construction method fits your project?
- What do concrete steps typically cost, and how do you maintain them?
- What causes concrete steps to fail, and how do you fix them?
- Trew Landscape’s pro checklist for a durable, styled result
- How should outdoor concrete steps handle drainage and water?
- How do concrete steps hold up through seasonal weather changes?
- What are the environmental considerations for concrete step projects?
- How does step lighting improve safety and appearance?
- What installers wish you knew before the job starts
- Trew Landscape LLC handles concrete steps from design to final walkthrough
- Sources
- FAQ
What design styles work best for concrete steps?
Concrete is one of the most adaptable stair materials available, which is exactly why the style decision matters so much. The wrong form for the architecture reads as an afterthought.
Traditional front steps use stacked, rectangular risers with a slight tread overhang. They suit craftsman bungalows, colonial facades, and brick ranch homes. A broom finish in a warm gray or buff tone blends naturally with brick and mortar. These are also the easiest form to pour in place, which keeps costs predictable.
Modern monolithic runs treat the stair as a single sculptural object, often with no visible riser face or a recessed shadow gap between treads. They pair well with contemporary homes that use large-format cladding, steel, or glass. Polished or acid-stained concrete in charcoal or slate tones reinforces the clean geometry.
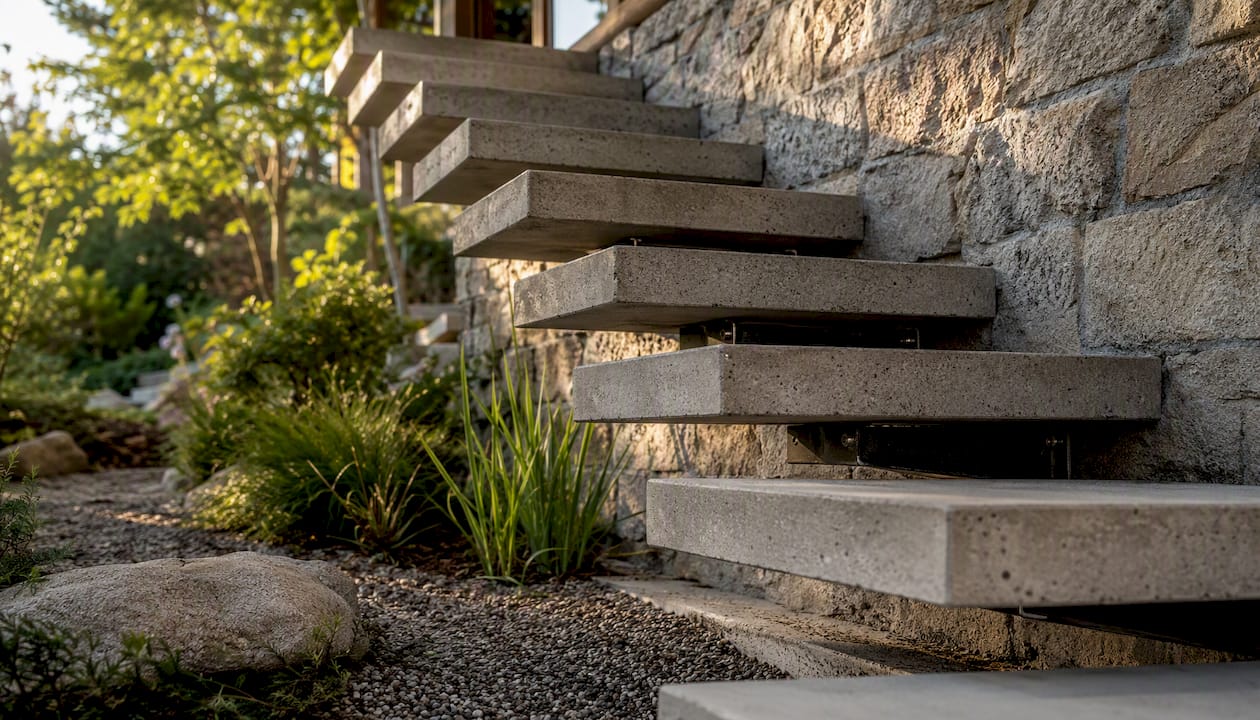
Floating or cantilevered treads are the most dramatic option. Individual treads appear to project from a wall with no visible support below. The structural work is more complex (each tread needs a steel bracket or embedded anchor), but the visual payoff is significant for entryways with a strong vertical wall to work from.
Curved and turning stairs soften a formal entry or work around a grade change that a straight run can’t handle cleanly. Curved forms require more formwork labor, so budget accordingly. Edge profiles matter here: a bullnose or rounded edge reads as intentional on a curved form; a sharp arris looks unfinished.
Integrated planter steps combine low retaining walls with step risers, letting planting beds cascade alongside the stair. This works especially well on sloped front yards where the grade change is 3 feet or more. Coordinate the concrete color with the planting palette and specify a cap detail on the planter walls that matches the tread nosing.
When gathering inspiration, pull photos from Houzz or Pinterest that show the full context, not just a close-up of the tread. Bring material swatches, note the total rise of your site, and mark any architectural features (window sills, brick coursing, door casing height) that the step design needs to align with.
How do you choose the right concrete finish for steps?
The finish is where aesthetics and safety intersect, and the two goals don’t always point in the same direction. A mirror-polished tread looks stunning indoors; outdoors in a wet Kansas City spring, it’s a liability.
The primary substrate choices are cast-in-place concrete, precast concrete units, and hybrid systems (a concrete structure with stone or porcelain treads set on top). Each accepts different finishes and has different tolerance for surface treatments.
Six widely used finish types cover most residential and commercial applications: trowel, broom, exposed aggregate, stamped, polished, and salt finish. Each has a distinct appearance, traction level, and maintenance profile.
- Broom finish: The workhorse for outdoor concrete stairs. Dragging a stiff brush across fresh concrete leaves fine ridges that grip wet shoes. Specify the broom pulled perpendicular to the direction of travel for maximum micro-texture.
- Exposed aggregate: Pea gravel or crushed stone is seeded into the surface and the cream layer washed away before curing. The result is a naturally textured, visually rich surface with excellent traction. Maintenance means periodic resealing to keep the aggregate bonded.
- Salt finish: Rock salt is pressed into fresh concrete and then dissolved with water, leaving small pits across the surface. Traction is good; the pitted texture can trap debris over time, so it needs regular sweeping and annual sealing.
- Stamped concrete: Rubber mats pressed into fresh concrete mimic stone, slate, or wood grain. Color is added through integral pigment or surface release agents. Stamped surfaces can be slippery when wet unless a non-slip additive is broadcast into the sealer. Read more about why stamped concrete works well for decorative hardscape projects.
- Polished concrete: Best reserved for interior stairs or covered porches. The grinding and densifying process produces a hard, low-maintenance surface, but wet traction is poor without an anti-slip treatment.
- Acid stain or dye: Applied to cured concrete to add color without changing the surface texture. Pair with a broom or exposed aggregate base for outdoor use; the color sits in the pores and won’t peel the way paint does.
For outdoor and high-traffic steps, a medium broom finish, exposed aggregate, or salt finish all provide significantly higher slip resistance than smooth, troweled surfaces.
Pro Tip: When specifying a stamped or stained finish, confirm that the sealer your contractor uses includes a non-slip aggregate additive. The decorative sealer alone often reduces traction below safe levels for exterior use.
Most stair failures originate at the interface between the structural concrete and the finish layer. Coordinating finish thickness and edge details at the design stage, before the forms are set, prevents delamination and cracked nosings down the road.
What safety dimensions and codes apply to concrete steps?
Safety code for stairs is not a suggestion. The ADA guidance for stairways addresses uniform riser heights, tread depths, nosings, handrail requirements, and recommends visual contrast on leading edges to assist people with low vision. The IRC (International Residential Code) sets the residential baseline.
The numbers that matter most:
- Riser height: 4 inches minimum, 7¾ inches maximum per the IRC. Aim for 7 inches as a comfortable residential target.
- Tread depth: 10 inches minimum (measured from nosing to nosing). An 11-inch tread pairs naturally with a 7-inch riser.
- Riser consistency: Model codes commonly limit variation across a flight to 3/8 inch or less. Human gait adapts to a flight in the first two steps; a single out-of-tolerance riser mid-flight is a serious trip hazard.
- Nosing: A 3/4-inch to 1¼-inch projection with a rounded or beveled undercut. Avoid sharp square nosings that catch toes.
- Handrail height: 34–38 inches above the tread nosing, continuous along the full run.
- Landing depth: At least as deep as the door swing, and no less than 36 inches in the direction of travel.
If the entry serves public access or a commercial property, flag ADA requirements early. A ramp may be required alongside the stairs, and the accessible route must be continuous from the public way to the building entrance.
Slip-resistance checklist for contractor review:
- Finish specified as broom, exposed aggregate, or salt (not smooth trowel) for outdoor treads
- Non-slip additive confirmed in sealer specification
- Tread pitch of ¼ inch forward slope per tread to shed water
- Visual contrast strip or contrasting aggregate on leading edge of each tread
- Handrail graspable profile confirmed (1¼–2 inch diameter round or equivalent)
Pro Tip: Ask your contractor to show you the riser tolerance they achieved on a recent job. A photo of a straightedge laid across the risers is a quick field check. Any gap larger than a coin’s thickness warrants a conversation.
How do you lay out concrete steps correctly?
The math is straightforward once you have one measurement: total rise, the vertical distance from the finished grade or floor at the bottom to the finished floor at the top.
The 2R + T rule is the standard geometry check: two times the riser height ® plus the tread depth (T) should equal 24–25 inches. A 7-inch riser and 11-inch tread satisfies this: 2(7) + 11 = 25. That combination produces a comfortable walking rhythm for most adults.
Step-by-step calculation:
- Measure total rise in inches (example: 42 inches).
- Divide by your target riser height (42 ÷ 7 = 6 steps).
- If the result isn’t a whole number, adjust riser height slightly and recheck: 42 ÷ 6 = 7.0 inches exactly. Good.
- Multiply number of treads by tread depth to get total run: 5 treads × 11 inches = 55 inches of horizontal space needed (the top landing is not a tread).
- Confirm the 2R + T check: 2(7) + 11 = 25. Within the 24–25 inch target.
- Verify riser height stays within code limits (4–7¾ inches).
Measurement checklist to bring to a site visit:
- Total rise from bottom grade to finished floor (measure at the door threshold)
- Door swing direction and clearance needed at the top landing
- Width of the opening or entry the steps must serve
- Any finish thickness allowances (stone treads add ¾–1½ inches to the structural tread)
- Location of any underground utilities, irrigation lines, or drainage pipes in the step footprint
Landing placement follows a simple rule: any door that swings outward needs a landing at least as deep as the door width, and that landing must be level (no more than ¼-inch slope for drainage). For a 36-inch door, that means a 36-inch-deep landing minimum.
Cast-in-place vs. precast: which construction method fits your project?
| Method | Best For | Key Advantage | Main Constraint |
|---|---|---|---|
| Cast-in-place | Custom shapes, curved forms, integrated planters | Total design freedom, monolithic look | Requires skilled formwork; curing time before use |
| Precast units | Straight replacement steps, tight timelines | Factory precision, consistent risers, faster install | Limited to standard sizes; crane access may be needed |
| Hybrid (concrete base + stone/porcelain treads) | Luxury entries, high-traffic commercial | Premium finish with structural concrete durability | Finish layer must be coordinated before forming |
Precast concrete steps reduce field variables by moving casting into a controlled facility. Riser tolerances, post sleeve locations, and drainage slope can all be cast in at the factory, which is harder to achieve consistently on a poured-in-place job. The trade-off is design flexibility: precast comes in standard widths and profiles.
Cast-in-place is the right call for curved forms, integrated planters, or any stair that needs to match a specific architectural profile. The concrete placement, finishing, and curing practices covered in ACI 332.1R-18 apply directly here: mix design, consolidation, and curing duration all affect the long-term durability of poured residential steps.
When hiring for either method, ask specifically about: rail post sleeve locations (cast-in sleeves outperform drilled brackets every time), drainage slope on each tread, and the curing window before the steps can carry foot traffic. A professional concrete installation also gives you access to proper consolidation equipment and experienced finishers who can hit riser tolerances a DIY pour rarely achieves.
What do concrete steps typically cost, and how do you maintain them?
Cost ranges vary by scope, finish, and site conditions. A basic 3-step front entry in cast-in-place concrete with a broom finish typically incurs a moderate installation cost in the Kansas City area, varying with width and site preparation. A longer flight (6–8 steps) with a stamped finish, integrated railings, and lighting provisions can reach $6,000–$12,000 or more.
| Finish Type | Relative Cost | Durability | Maintenance Frequency |
|---|---|---|---|
| Broom finish | Low | High | Annual sealing |
| Exposed aggregate | Medium | High | Annual sealing, periodic washing |
| Stamped concrete | Medium-High | Medium-High | Sealing every 2–3 years |
| Acid stain/dye | Medium | High (color fades over time) | Annual sealing |
| Polished (interior) | High | High | Periodic re-densifying |
Cost drivers beyond the finish itself:
- Railings: Wrought iron, steel cable, or aluminum rail systems add $400–$1,200 per side depending on height and material.
- Site prep: Demolition of existing steps, excavation depth, and subbase compaction all affect labor hours.
- Finish thickness: Stone or porcelain treads on a concrete base add material cost but extend the life of the decorative surface.
Maintenance by finish type follows a consistent pattern: seal outdoor concrete annually in climates with freeze-thaw cycles, use a penetrating silane-siloxane sealer rather than a film-forming acrylic for exterior steps, and never use rock salt or calcium chloride deicers directly on concrete treads. Sand is the safe alternative for winter traction.
What causes concrete steps to fail, and how do you fix them?
Most failures trace back to one of four causes: freeze-thaw scaling, drainage-induced settlement, delaminated overlays, or inconsistent risers from poor formwork.
Freeze-thaw scaling appears as surface flaking, usually starting at the tread edges. It’s caused by water penetrating the surface, freezing, and expanding. Prevention is a penetrating sealer applied before the first winter. Repair options range from a bonded overlay (for surface-only damage) to full tread replacement when the scaling has reached the aggregate layer.
Settlement shows up as a gap opening between the step and the foundation wall, or as a visible tilt in the flight. The cause is almost always inadequate subbase compaction or poor drainage allowing water to erode the base material. A settled flight needs the drainage problem fixed first; otherwise any repair will fail again. Subsurface drainage solutions like drain tile can address the root cause before a repair pour.
Delaminated overlays peel away from the structural concrete, usually within 2–5 years of installation. The cause is nearly always a contaminated or improperly prepared bond surface, or an overlay applied too thin. Patch with a bonded repair mortar only if the delamination is isolated; widespread delamination means removing the overlay entirely and starting over.
Inconsistent risers are a formwork failure. If you tap a riser and it sounds hollow, or if you can see a visible step in the riser face, the form shifted during the pour. Minor variation (under 3/8 inch) can sometimes be corrected with a bonded topping; larger variation requires cutting and replacing the affected riser.
When to call a contractor: any settlement, any structural crack wider than a hairline, or any riser inconsistency that exceeds 3/8 inch across the flight. Bring photos, a tape measure reading of the total rise at multiple points, and the approximate age of the steps.
Trew Landscape’s pro checklist for a durable, styled result
A well-scoped project brief prevents the most common on-site surprises. Use this checklist when reviewing bids or preparing for a site visit.
Site survey to final walkthrough:
- Measure total rise at the door threshold and at both sides of the opening (they often differ).
- Confirm subbase depth and compaction specification (4–6 inches of compacted gravel minimum for exterior steps).
- Mark underground utilities, irrigation lines, and existing drainage paths in the step footprint.
- Specify riser tolerance in writing: 3/8-inch maximum variation across the flight.
- Confirm finish type, direction of broom stroke (if applicable), and color sample approval before the pour.
- Specify post sleeve locations before forming; cast-in sleeves are non-negotiable for permanent railings.
- Confirm tread drainage slope: ¼-inch forward pitch per tread.
- Review lighting provisions: conduit sleeves or low-voltage wire channels should be set before the pour.
- Agree on curing duration before foot traffic (typically 7 days minimum for exterior steps).
- Schedule a final walkthrough to check riser consistency, nosing profile, and drainage direction before the contractor demobilizes.
Contractor brief template (copy and fill in):
- Scope: [number] steps, [width] inches wide, [finish type], [color/stain]
- Riser tolerance: 3/8 inch maximum variation
- Post sleeve locations: [left/right/both sides], [height above tread]
- Drainage slope: ¼ inch per tread, draining away from structure
- Lighting provisions: [conduit size and location]
- Known site constraints: [existing drainage, utilities, access limitations]
- Timeline: Site prep [date], pour [date], usable [date]
Pro Tip: Decide on your railing style before the forms are set. Changing from a surface-mounted bracket to a cast-in sleeve after the concrete cures means coring into finished concrete, which weakens the anchor and adds cost.
How should outdoor concrete steps handle drainage and water?
Water is the primary enemy of outdoor concrete stairs. Standing water on treads accelerates freeze-thaw damage, promotes algae growth that reduces traction, and, over time, erodes the subbase and causes settlement.
Every tread should carry a ¼-inch forward pitch to move water off the surface and away from the structure. That slope is barely perceptible underfoot but makes a measurable difference in how quickly treads dry after rain. At the base of the flight, grade the surrounding landscape to direct runoff away from the step footprint, or install a channel drain or catch basin to intercept sheet flow before it reaches the subbase.
For sites with significant grade change or clay-heavy soil (common in Kansas City), subsurface drainage is worth specifying alongside the step project. Stormwater drainage solutions integrated at the base of a stair flight prevent the soil erosion that leads to settlement. The joint between the step and the foundation wall is a particular vulnerability: seal it with a backer rod and polyurethane caulk, and inspect it annually.
How do concrete steps hold up through seasonal weather changes?
Kansas City’s climate puts concrete through real stress: hot, humid summers followed by freeze-thaw cycles that can run 40–50 events per winter season. Steps that aren’t designed for that range fail faster than the surrounding flatwork because water pools on horizontal tread surfaces.
The most effective protection strategy combines three things: a low water-to-cement ratio mix (0.45 or lower) for the pour itself, air entrainment in the mix to accommodate freeze-thaw expansion, and a penetrating silane-siloxane sealer applied after the concrete has cured for at least 28 days. Reapply the sealer annually or whenever water stops beading on the surface.
Avoid film-forming acrylic sealers on exterior steps in freeze-thaw climates. They trap moisture below the surface, which accelerates scaling. And never apply deicing salts directly to concrete treads; the chemical reaction between chloride ions and concrete paste weakens the surface layer within a single season. Sand provides traction without the damage.
What are the environmental considerations for concrete step projects?
Concrete production is energy-intensive, but the material’s longevity works in its favor. A well-built concrete stair that lasts 40–50 years has a lower lifetime environmental footprint than a wood or composite stair replaced every 15–20 years.
Several mix-design choices reduce the carbon intensity of a concrete step project without compromising performance. Many ready-mix suppliers in the Kansas City area offer blended mixes on request.
Locally sourced aggregate reduces transportation emissions and supports regional suppliers. For decorative finishes, water-based stains and dyes carry a lower VOC load than solvent-based alternatives and perform comparably on sealed exterior concrete. If the project involves demolishing existing steps, crushed concrete can often be reused as subbase fill rather than hauled to a landfill.
How does step lighting improve safety and appearance?
Lighting transforms a concrete stair from a functional element into a design feature, and it does real safety work after dark. The most effective approach layers two types: riser-face lights that illuminate each tread from below, and path or post lights at the top and bottom landings that mark the transition between grade levels.
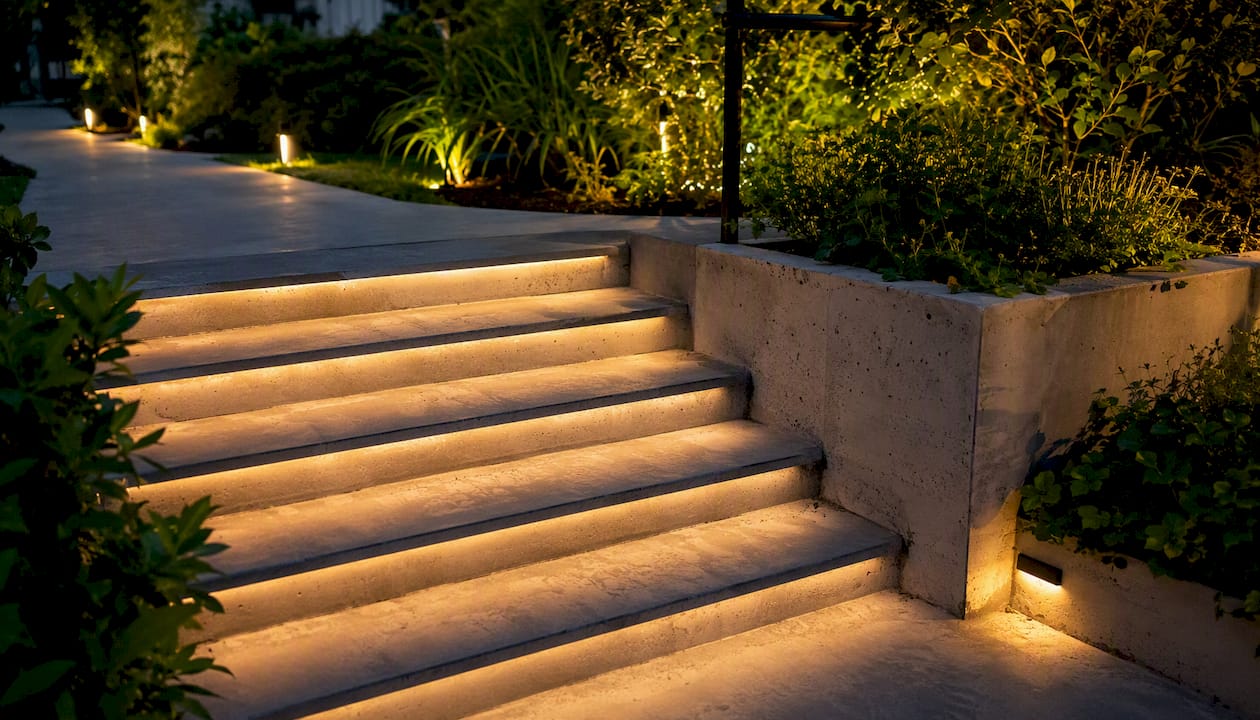
Low-voltage LED fixtures recessed into the riser face are the most popular choice for residential steps. They draw minimal power, last 25,000–50,000 hours, and are available in warm white (2700K–3000K) for a welcoming entry tone or cool white (4000K) for a modern, architectural look. The conduit for these fixtures must be set before the concrete is poured; retrofitting requires coring, which is expensive and weakens the riser.
For a simpler installation, surface-mounted step lights with a low-profile housing can be set into the riser face after curing using a standard masonry bit and waterproof wire connection. They’re less elegant than recessed fixtures but workable on existing steps. Pair step lighting with landscape lighting along the adjacent walkway to create a continuous, safe path from the street to the entry.
Solar-powered step lights are an option for sites where running low-voltage wire is impractical, but their output is inconsistent in shaded entries or during overcast winters, which is a real limitation in Kansas City from November through March.
What installers wish you knew before the job starts
The decisions that cost the most money on a concrete stair project are almost never the ones homeowners expect. The big-ticket surprises aren’t the pour or the finish. They’re the things nobody decided before the crew showed up.
Rail post locations are the clearest example. A homeowner who hasn’t chosen a railing style by pour day forces the contractor to either delay or guess. Cast-in post sleeves are structurally superior to drilled brackets, but they have to be positioned before the forms are set. Changing that decision after the fact means coring into cured concrete and accepting a weaker anchor. Decide on your rail style, post spacing, and diameter before the site visit, not after.
The same logic applies to lighting and drainage. Conduit sleeves cost almost nothing to set during forming. Running wire through cured concrete costs significantly more and produces a less clean result. And drainage slope, that ¼-inch pitch per tread, has to be built into the form. You can’t add it after the fact.
Finish decisions are the third common delay. Color samples, broom direction, and sealer type should all be confirmed in writing before the pour date. A crew that shows up without a signed finish spec will either wait or make a judgment call, and judgment calls on finish are rarely what the homeowner pictured.
Trew Landscape LLC handles concrete steps from design to final walkthrough
Concrete steps are one of the most visible hardscape elements on any property, and getting them right requires more than a good pour. It requires coordinated design, proper drainage, and finish decisions made before the forms go in.

Trew Landscape LLC handles the full scope in Kansas City: site survey, drainage planning, concrete forming and placement, decorative finishes, rail provisions, and landscape lighting integration. The team brings the same installer-first checklist described above to every project, which means fewer surprises on pour day and steps that hold up through Kansas City winters without the scaling and settlement that cut-rate pours produce.
For projects that pair steps with a broader hardscape design — terraces, paver patios, retaining walls, or integrated planters — Trew Landscape LLC coordinates all trades under one contract. Bring your total rise measurement, a photo of the entry, and a rough style direction to the first consult. The team will scope the project, walk through finish options, and provide a written bid with riser tolerance and drainage slope specified. Request a concrete project consultation to get started.
Sources
- Concrete Steps — Stair Design & Standard Height
- Precast Concrete Steps: The Smart, Complete Design Guide
- Concrete stairs: ADA guidance for stairways (stairs.pdf)
- ACI 332.1R-18 Preview (residential concrete guide)
- 6 Types of Concrete Finishes – Concrete Finishing Techniques
FAQ
What are the most common problems with concrete steps?
Freeze-thaw scaling, settlement from poor drainage, delaminated overlays, and inconsistent risers from shifted formwork are the four most frequent failures. Most are preventable with proper mix design, a penetrating sealer, and adequate subbase compaction before the pour.
What is the average cost of concrete steps?
A basic 3-step front entry with a broom finish typically costs several thousand dollars installed. A longer flight with stamped finish, railings, and lighting provisions can reach $6,000–$12,000 or more, depending on width, site prep, and finish complexity.
How do you lay out concrete steps correctly?
Measure total rise, divide by your target riser height (7 inches is a reliable residential starting point), and confirm the result with the 2R + T rule: two times the riser plus the tread depth should equal 24–25 inches. A 7-inch riser paired with an 11-inch tread satisfies that check exactly.
How do you make concrete steps look better?
Finish choice makes the biggest visual difference: stamped concrete, acid stain, or exposed aggregate all add character that plain gray broom finish can’t match. Adding recessed riser lighting, a contrasting nosing strip, and coordinated railings turns functional steps into a genuine entry feature.
What triggers ADA requirements for concrete steps?
Any stair serving public access or a commercial property should be reviewed against ADA stairway guidance, which covers uniform riser heights, tread depths, nosing profiles, handrail continuity, and visual contrast on leading edges. A ramp providing an accessible route alongside the stairs is typically required when the entry serves the public.