
Trew Landscape Blog
4 Week Watering Plan for New Sod: Spray and Rotor Runtimes
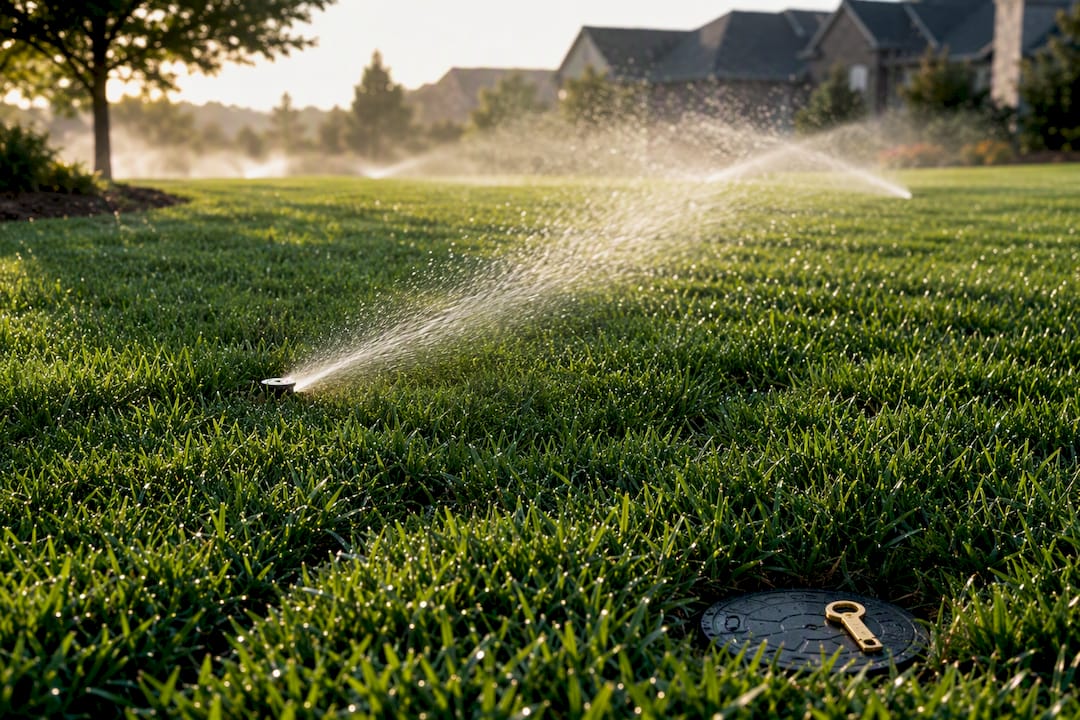
4 Week Watering Plan for New Sod: Spray and Rotor Runtimes ! New sod receiving even irrigation coverage Water new sod immediately after installation, soaking it thoroughly so moisture reaches the soil underneath.
4 Week Watering Plan for New Sod: Spray and Rotor Runtimes
Water new sod immediately after installation, soaking it thoroughly so moisture reaches the soil underneath. Then keep the top soil layer consistently damp with multiple short sessions a day for the first week. Water early in the morning, before 10 a.m., to limit evaporation and disease risk. Skip evening watering entirely. This first week sets the pace for everything that follows, and university extension guidance backs it up almost universally.
TL;DR:
- Water new sod immediately after installation until the soil is moist six inches deep, then maintain a damp top layer for the first week.
- Adjust watering frequency weekly based on weather, grass type, and soil moisture, avoiding fixed timers that do not respond to changing conditions.
- Conduct weekly tug and screwdriver tests to determine root establishment and soil moisture, and update the schedule accordingly rather than relying solely on a calendar.
- Overwatering causes root rot and fungal issues with puddling and muddy soil, while underwatering leads to yellowing, curling blades, and thinning turf.
- Proper soil preparation and professional installation increase the chances of fast rooting within two weeks and reduce the risk of establishment failure.
Table of Contents
- How Often Should You Water New Sod in the First 30 Days?
- How Do You Adjust Watering for Different Grass Types and Weather?
- How Do You Know When New Sod Has Rooted?
- Why Is My New Sod Turning Yellow or Spongy?
- When Should You Mow and Fertilize New Sod?
- How Trew Landscape Prepares Sod for Successful Rooting
- How Do You Prepare Soil Before Laying New Sod?
- What’s the Watering Schedule After the First Month?
- What Watering Technique Works Best for New Sod?
- Why the Standard Sod Watering Advice Misses the Point
- Get a Custom Watering Plan With Professional Sod Installation
- Sources
- FAQ
How Often Should You Water New Sod in the First 30 Days?
The honest answer: it changes every week, and the biggest mistake homeowners make is treating a new sod watering schedule like a fixed setting instead of a moving target. Your irrigation controller doesn’t know it’s 95 degrees on Tuesday and 68 with cloud cover on Wednesday. You do. That’s why extension agronomists keep repeating the same warning: set-and-forget timers fail new sod more often than any other single mistake, according to Mississippi State Extension.
Here’s the schedule broken into four phases, with runtimes for both spray heads and rotor heads, since they apply water at very different rates.
Days 1 through 7: keep it moist, not soaked. Run spray heads for several minutes per session, or rotor heads for a longer duration, split across multiple sessions daily. In extreme heat, add additional short sessions. Immediately after the sod goes down, water it thoroughly enough to moisten the soil roughly 6 inches deep, per UAEX. That first soak matters more than any session that follows it.
Days 8 through 14: pull back frequency, add duration. Drop to 1 to 2 sessions per day, but lengthen each one, spray heads to 15 to 20 minutes, rotors to 25 to 35 minutes. You’re coaxing roots downward now instead of just keeping the surface from drying out. Roots are typically visible penetrating the soil within roughly two weeks for most grass species.
Days 15 through 21: let the tug test decide. If the sod resists a firm pull, move to once-daily deep watering. If it still lifts easily, stay every other day with a slightly longer runtime. This is the phase where a rigid calendar schedule starts working against you. Some yards root faster on the south-facing slope than the shaded north side, and that variation is normal.
Days 22 through 30: transition toward maturity. Cut back to 2 to 3 deep waterings per week, spray heads around 20 minutes, rotors 30 to 40 minutes. This mimics the schedule a mature lawn will eventually need and starts training roots to grow deeper rather than cluster near the surface.
Rain changes the math every time. A half inch of rain replaces roughly one scheduled session; skip that day’s watering and check soil moisture the next morning instead of watering on autopilot.
Copy this checklist straight into your irrigation controller notes:
- Day 1: water immediately after installation until soil is moist 6 inches deep.
- Days 1 to 7: 2 to 4 sessions/day, spray 10 to 15 min or rotor 20 to 30 min, before 10 a.m. and again mid-afternoon if needed.
- Days 8 to 14: 1 to 2 sessions/day, longer runtimes (spray 15 to 20 min, rotor 25 to 35 min).
- Days 15 to 21: tug test weekly; move to once-daily or every-other-day deep soaks.
- Days 22 to 30: 2 to 3 deep soaks weekly, spray 20 min, rotor 30 to 40 min.
- Any day with 0.5 inch or more of rain: skip scheduled watering, check moisture the next morning.
This general sequence, easing frequency while increasing duration week over week, matches what LawnBySeason recommends and what most extension programs teach, even though the exact minutes shift by climate and soil type.
How Do You Adjust Watering for Different Grass Types and Weather?
Not all sod roots at the same speed, and treating Bermuda like tall fescue is a fast way to either drown or starve your new lawn.
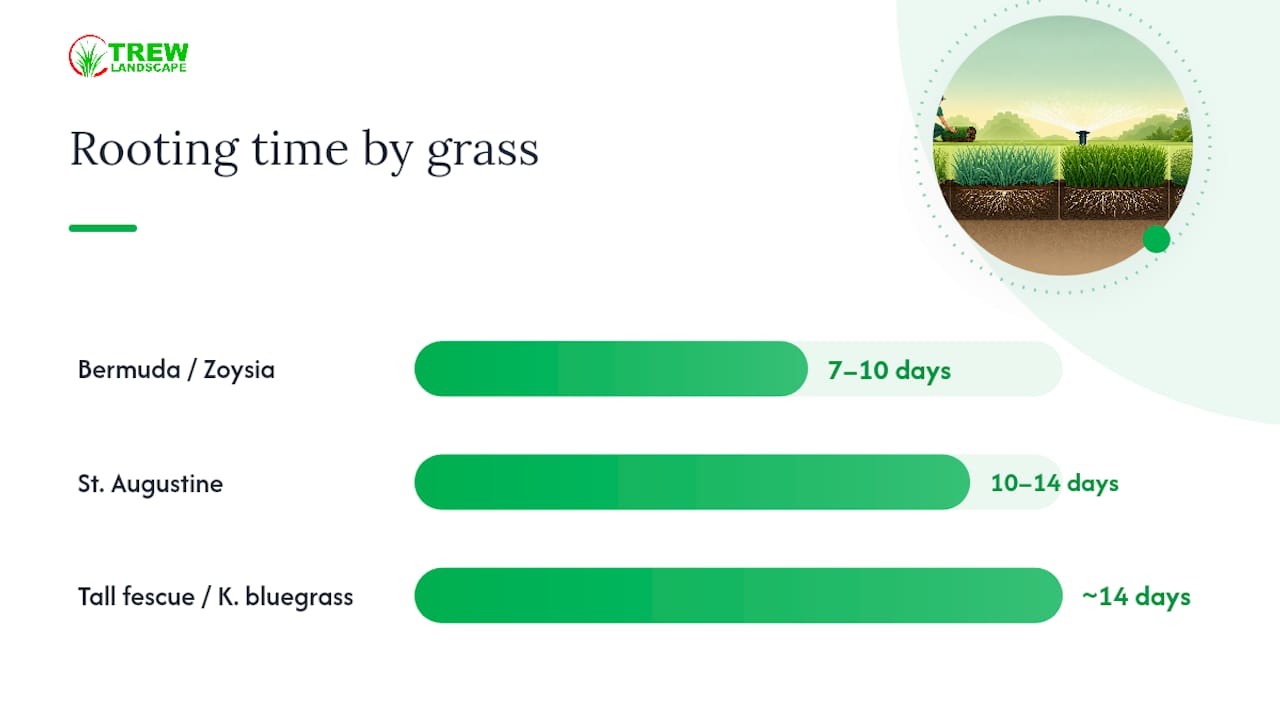
- Bermuda and zoysia (warm-season, aggressive rooting): often anchor in 7 to 10 days. You can usually start reducing frequency slightly earlier than the standard 14-day mark, but keep watching soil moisture rather than the calendar.
- St. Augustine: roots more slowly and its wide blades shade the soil less evenly, so it dries unevenly across a lawn. Give it the full 10 to 14 days before easing off, and watch for pale, curling blades as an early stress sign.
- Tall fescue and Kentucky bluegrass (cool-season): tend to root a bit slower in warm soil and need more consistent moisture through the first two weeks, especially if installed outside their ideal fall or early spring window.
- Heat above 85°F with wind: add one extra short session, even mid-day misting, since wind pulls moisture out of thin sod faster than heat alone. Crews often plan installation for the coolest part of the day and mist in the afternoon during heat spikes specifically to stop blade desiccation, a tactic detailed by UAEX.
- Cool, overcast stretches: cut back one session per day. Overwatering in mild weather is more common than underwatering.
Pro Tip: *St. Augustine on a slope needs special handling. Water in two shorter bursts instead of one longer session so moisture soaks in rather than running downhill before the roots can use it.
If your yard has shaded sections under trees or on the north side of the house, those areas dry slower and need less frequent watering than sunny stretches, worth remembering before you choose grass for low-light zones.
How Do You Know When New Sod Has Rooted?
Skip the guesswork. Three simple field checks tell you exactly where your lawn stands.
- Tug test: grab a handful of grass blades at one corner and pull gently upward. If it resists and stays put, roots have anchored into the soil below. If it lifts like a rug, it needs more time and more frequent watering.
- Screwdriver test: push a screwdriver into the soil to the handle. If it slides in easily, moisture is adequate. If you’re fighting to get it in, the soil is too dry regardless of what your irrigation timer says.
- Visual check under a lifted corner: look for dark, moist soil and small white root hairs threading into the ground. Dry, pale soil with no visible roots means you’re not ready to ease off watering yet.
Check at least three spots, sunny, shaded, and near an edge or seam, since these zones almost never root at the same rate. Seams and narrow strips under 9 inches wide dry out fastest of anywhere in the yard.
Why Is My New Sod Turning Yellow or Spongy?
Most establishment failures trace back to one of two extremes, and both are fixable if you catch them early.
Overwatering shows up as spongy turf, a sour smell, standing puddles, or muddy soil that squishes underfoot. Root rot and fungal disease follow fast once soil stays saturated. The fix is immediate: cut the number of daily cycles, not just the runtime, and improve drainage if water is pooling instead of soaking in.
Underwatering looks different, blue-gray or yellowing blades, edges curling upward, and visible shrinkage or gapping between strips. If you catch it early, soak the affected area thoroughly and temporarily bump watering frequency for 2 to 3 days before returning to schedule.
- Irrigation blind spots along fence lines, under eaves, and near driveways often get missed entirely by rotating heads, since edges and seams dry out first when irrigation heads don’t reach them fully.
- Hand-water these zones directly rather than assuming the sprinkler system has them covered.
- On slopes, shorten the runtime and add a second cycle rather than one long soak that just runs off before it absorbs.
- If yellowing or thinning persists past two weeks despite correct watering, that usually points to a soil or grading issue underneath, not a watering problem, and it’s worth a professional look.
Puddling anywhere on a new lawn is one of the clearest overwatering signals extension programs flag, and it calls for reducing the irrigation cycle immediately rather than waiting to see if it improves.
When Should You Mow and Fertilize New Sod?
Don’t mow on a calendar. Mow on the tug test. Once the sod resists a firm pull and the grass has visibly resumed upright growth, usually somewhere in the Week 3 to 4 window, you’re clear for the first cut.
- Set the mower to the highest cutting height for the first pass, and never remove more than one third of the blade length.
- Use sharp blades. Dull blades tear new turf instead of cutting it, which stresses roots that are still establishing.
- Hold off on fertilizer until 30 to 60 days after installation, and start with a conservative, low-nitrogen application rather than a heavy feed. New roots can’t process a big nutrient load yet.
- Keep foot traffic, kids, pets, lawn furniture, off the new sod for 3 to 4 weeks while roots take hold underneath.
- Time both mowing and fertilizing to line up with the watering transition: once you’re watering 2 to 3 times a week instead of daily, the lawn is generally ready for its first light feeding.
How Trew Landscape Prepares Sod for Successful Rooting
Getting a new sod watering schedule right starts before the sod ever touches the ground. Soil needs to hold moisture without being soggy on delivery day, since sod laid on bone-dry soil struggles to root no matter how diligently you water afterward.
Rolling the new sod with a water-filled lawn roller right after installation removes air pockets and presses roots into direct contact with the soil, a step that watering alone cannot substitute for, according to UGA Extension. In Kansas City summers, our crews time deliveries for the coolest part of the day and add a mid-afternoon misting during heat spikes to stop blades from drying out before roots take hold, the same heat-protection approach we detail for extreme conditions. Edges and seams get hand-watered separately, since they dry out well before the rest of the lawn catches up.
How Do You Prepare Soil Before Laying New Sod?
Good soil prep is the difference between sod that roots in 10 days and sod that struggles for a month. Start by clearing the area of old grass, rocks, and construction debris, then till the top 4 to 6 inches to break up compaction that would otherwise block root penetration.
Grade the surface so water flows away from the house’s foundation, and work in compost or topsoil if your existing soil is heavy clay or thin and sandy. A soil test beforehand tells you whether you need lime or a starter fertilizer worked in before the sod arrives; guessing here often costs you weeks later. Rake the surface smooth and lightly water it the day before delivery so the sod meets damp, not dry or muddy, ground.
Without solid soil-to-root contact, frequent watering alone won’t produce a healthy lawn, since roots simply cannot penetrate compacted or air-gapped soil no matter how much moisture sits on top of it. That’s why rolling immediately after installation matters as much as the prep work that came before it.
What’s the Watering Schedule After the First Month?
Once your lawn clears the 30-day mark, the goal shifts from survival to depth. Shallow, frequent watering trains roots to stay near the surface, which leaves your lawn fragile during heat waves and drought restrictions.
Move to 2 to 3 deep waterings per week, aiming for roughly 1 to 1.5 inches of water total weekly, adjusted for rainfall. Water early morning still, and let the soil dry out somewhat between sessions rather than keeping it constantly damp. That drying period is what pushes roots down in search of moisture instead of clustering in the top inch of soil.
Watch the lawn itself for cues rather than sticking to a rigid weekly count. Footprints that stay visible for more than a few minutes after you walk across the grass mean it’s time to water. A slight blue-gray cast to the blades is another early drought signal worth acting on before the lawn browns. Adjust downward in cooler months and upward during extended heat, the same principle that governed the first 30 days, just spread across a longer interval now that roots are established.
What Watering Technique Works Best for New Sod?
The right technique depends on your irrigation setup, but the goal stays constant: even coverage without runoff.
Spray heads deliver water quickly and cover smaller, uniform zones well, which is why their runtimes sit shorter (10 to 20 minutes) than rotor systems. Rotor heads apply water more slowly over a wider radius, which is why they need longer runtimes (20 to 40 minutes) to deliver an equivalent amount. Mixing head types on the same zone almost guarantees uneven watering, since one type finishes its job while the other is still catching up.
For yards without a full irrigation system, an oscillating or impact sprinkler run in overlapping passes gets reasonably even coverage, though it demands more manual attention than a zoned system. Whatever you use, check for dry strips between passes, particularly along property lines and near hardscape edges where coverage commonly falls short.
Why the Standard Sod Watering Advice Misses the Point
Most watering guides hand you a calendar and call it done. Water daily for ten days, then taper off. That advice isn’t wrong, but it treats every lawn like it faces identical soil, sun, and weather, and that’s rarely true even across a single property.
What the research actually supports is a shift in mindset: the calendar tells you roughly where to start, but the tug test, the screwdriver check, and a look at what’s happening under a lifted corner tell you what’s actually happening underground. Homeowners who lean entirely on a timer, set it and check back in three weeks, run into more failed sod than those who spend two minutes a day reading their lawn.
The piece most people skip entirely is edge and seam care. It’s not glamorous, and it’s not on most watering charts, but seams dry out first and fail first. If you prioritize one thing beyond the basic schedule, prioritize that.
— Trew Landscape LLC
Get a Custom Watering Plan With Professional Sod Installation
Getting the soil prep, rolling, and first watering right is where most sod problems start, or never start at all. Trew Landscape LLC handles the parts that determine whether your lawn roots in two weeks or struggles for two months: proper site grading, soil amendment, a full irrigation check before sod ever touches the ground, and a handoff watering plan built around your specific yard, sun exposure, and grass type.

Hiring a professional for sod installation removes the guesswork on runtimes, head coverage, and timing that trips up even attentive homeowners. Our crews roll every install for full root contact, hand-water seams during the critical first week, and walk you through exactly how to adjust the schedule once we leave. If you’re planning a project and want to see what it costs before committing, check our Kansas City sod pricing guide or request a quote directly through our sod installation page to get your inspection scheduled.
Sources
- Seeding and sodding home lawns — University of Minnesota Extension
- Sod installation and maintenance — Mississippi State Extension
- Establishing a lawn from sod — UAEX (University of Arkansas Cooperative Extension)
- Watering new sod — LawnBySeason
FAQ
Does new sod need to be watered every day?
Yes, for roughly the first 10 to 14 days. Daily watering, split into 2 to 4 short sessions, keeps the top inch of soil moist while roots establish, according to UAEX.
How long can new sod go without watering?
New sod can dry out and start dying within a day or two during the first week if temperatures are warm, since it has no established root system to draw moisture from deeper soil. Even one missed day in hot weather can cause visible stress.
Can you overwater new sod?
Yes, and it’s a common mistake. Standing puddles, muddy soil, and a spongy feel underfoot signal overwatering, which encourages root rot and disease, per Mississippi State Extension. Reduce the number of cycles immediately if you see these signs.
What is the best watering schedule for sod?
Water thoroughly at installation, then run 2 to 4 short sessions daily for the first week, taper to 1 to 2 sessions with longer runtimes through week two, and shift to deep soaks 2 to 3 times weekly by week four. Confirm readiness at each stage with a tug test rather than the calendar alone.