
Trew Landscape Blog
Follow the CPSC 6 Feet Rule: Backyard Play Ideas from DIY to Pro
Follow the CPSC 6 Feet Rule: Backyard Play Ideas from DIY to Pro ! DIY backyard play features with safe surfacing The best backyard play area starts with a defined footprint, shock-absorbing surfacing under and around anything kids climb or swing on, and a mix of open-ended, nature-based features that cost little to build.
Follow the CPSC 6 Feet Rule: Backyard Play Ideas from DIY to Pro
The best backyard play area starts with a defined footprint, shock-absorbing surfacing under and around anything kids climb or swing on, and a mix of open-ended, nature-based features that cost little to build. The CPSC’s playground safety guidance sets the baseline for spacing and surfacing. From there, this guide walks through DIY builds, mid-range upgrades, and pro-level installs, so you can match the plan to your yard and your budget.
TL;DR:
- Protective surfacing must extend at least 6 feet beyond play equipment, with swing zones requiring double that distance due to higher launch potential.
- Loose-fill surfacing materials like rubber mulch or engineered wood fiber need containment edging, regular raking, and reapplication to maintain safety and depth.
- Natural play features such as earth mounds and loose parts increase children’s physical activity and imaginative play compared to fixed structures.
- Professional site prep, including grading and drainage, is essential for safety and durability, especially on sloped or water-prone yards.
- Small yards can maximize space through vertical and corner features, but safe low-cost builds require checking for hazards and proper surfacing containment.
Table of Contents
- Backyard Play Area Ideas by Effort Level
- Where to Put It: Spacing, Surfacing, and Site Planning
- Choosing Surfacing: What Holds Up and What Doesn’t
- Fitting Play Into Small Yards and Different Ages
- Budget DIY Builds and What to Watch For
- Keeping the Play Area Safe Season After Season
- How Trew Landscape LLC Approaches Backyard Play Design
- Get Professional Help With Site Prep and Surfacing
- Where to Verify Safety Guidance
- Sources
- FAQ
Backyard Play Area Ideas by Effort Level
Not every good idea requires a contractor. Some of the most engaging backyard fun zones cost almost nothing beyond a Saturday afternoon, while others are worth saving up for. Here’s a working list organized by how much effort and money each one takes.
Low-cost and DIY:
- Mud kitchen. An old dresser or pallet shelving unit with a few pots and a water jug turns dirt into an afternoon of sensory play. Kids as young as two enjoy it; keep it away from walkways so mud doesn’t track onto surfacing. Upgrade later with a real sink basin plumbed to a garden hose.
- Balance beam from a fallen log or landscape timber. Set it flush to the ground for toddlers, or raise it a few inches on buried supports for older kids. Sand or bark under it reduces injury risk if a child slips off.
- Stump and stone stepping path. Buried tree stumps or flat stones spaced for small strides build coordination. Space them close for younger children and check that each one sits flat and doesn’t wobble.
- Sensory garden bed. Herbs, ornamental grasses, and textured leaves next to a play zone give kids something to touch and smell. This doubles as a low-maintenance border for the rest of the yard.
- Rope swing on an existing tree limb. Inspect the branch for rot first. Because swings need generous approach room, this works best where you already have open lawn in front and behind.
Moderate upgrades:
- Sandbox with a lid. A built sandbox with a hinged cover keeps out rain and animals between uses; add measuring cups and buckets for open-ended digging play.
- Water table or splash pad zone. A simple in-ground drain and a rubber mat underneath prevent the puddling that turns grass to mud by midsummer.
- Climbing net or cargo net frame. Anchored between two posts, a net builds upper-body strength and works for a wider age range than a fixed ladder.
- Playhouse or reading nook. A small freestanding structure with a shaded roof gives kids a retreat and gives you a clear boundary marker for the play zone.
- Chalkboard or mud wall. A weatherproof panel mounted on a fence gives younger kids a creative outlet without any equipment underfoot.
Landscaper-level installs:
- Turf playfield with a defined border. Artificial turf handles heavy foot traffic without the bare patches and mud that natural grass develops under swings and slides.
- Poured-in-place rubber surfacing under a play structure. This is the most durable shock-absorbing option and needs no annual topping up, though it costs more upfront than loose fill.
- Natural play mound or berm. A graded earth mound with boulders and plantings gives kids a hill to climb without a single piece of manufactured equipment. Reviews show that nature-based play environments support longer, more varied play episodes and greater physical activity than fixed equipment alone.
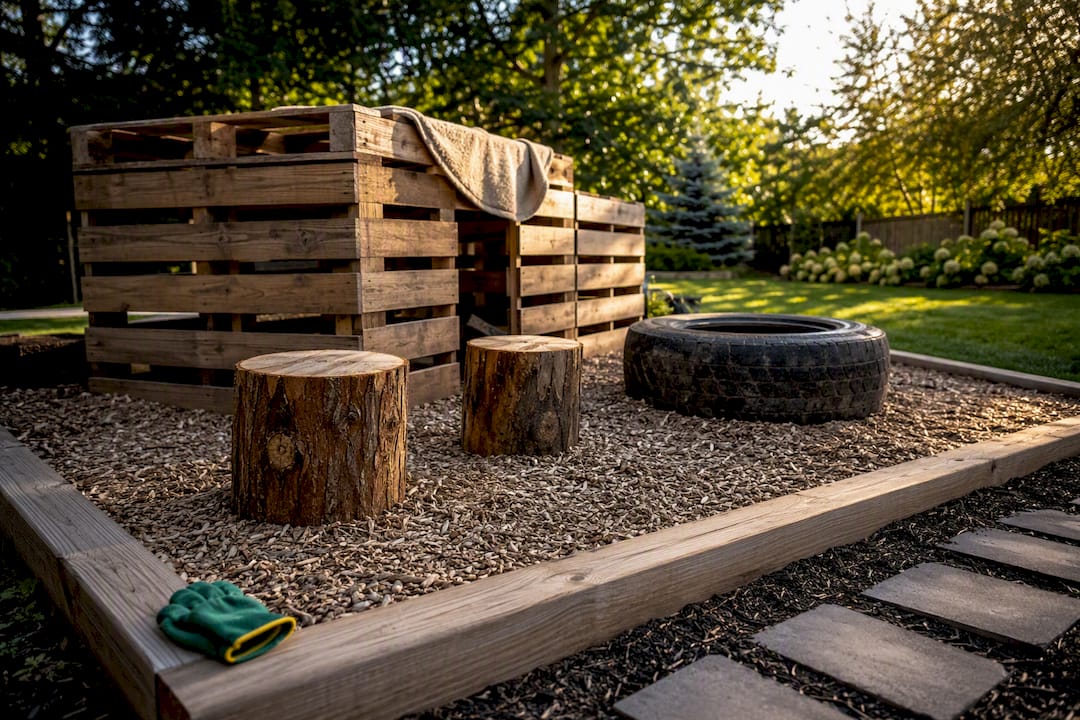
- Loose-parts play zone. Stumps, crates, planks, and tires arranged in an open area let kids build their own games. A 2024 literature review update found that loose natural materials increase both activity levels and imaginative play compared to static structures.
Pro Tip: Group your loudest, most active zones (swings, climbing structures) on one side of the yard and quieter zones (sandbox, reading nook) on the other. It cuts down on collisions and gives you sightlines to both from the patio.
Where to Put It: Spacing, Surfacing, and Site Planning
CPSC guidance is specific about spacing, and skipping it is where most backyard setups go wrong. Protective surfacing needs to extend at least 6 feet beyond the equipment’s perimeter in every direction, and swings need extra room because kids launch off them.
- Extend surfacing 6 feet minimum around climbers, slides, and play structures, measured from the outer edge of the equipment.
- Double the swing zone. For swings, extend surfacing in front and back a distance equal to twice the height of the suspension bar, since a swinging child covers more ground than a stationary one.
- Pick a level, well-drained spot. Low areas that pond water turn loose-fill surfacing to sludge within a season.
- Clear the site first. Remove roots, rocks, and low branches that could snag a swing arc or trip a running kid.
- Separate age groups by sightline, not just distance. Put toddler equipment where you can see it from the kitchen window; put climbing structures for older kids where you can still glance over without standing guard.
That 6-foot rule surprises a lot of homeowners because it applies well past the equipment’s footprint, not just directly underneath it. A swing set with an 8-foot suspension bar needs 16 feet of surfacing in front and behind it, on top of the standard perimeter, which eats up more yard than most people budget for on paper.
Choosing Surfacing: What Holds Up and What Doesn’t
Surfacing is the one decision that affects both safety and how much upkeep you’ll do every spring. Here’s how the common options compare.
| Material | Cushioning | Maintenance | Best for |
|---|---|---|---|
| Engineered wood fiber | Good | Needs annual topping | Budget installs, natural look |
| Wood chips | Moderate | Decomposes fastest | Temporary or low-traffic areas |
| Shredded rubber mulch | Very good | Low, doesn’t decompose | High-traffic zones, long-term use |
| Sand or pea gravel | Moderate | Needs raking, migrates | Sandbox areas, not under swings |
| Artificial turf | Good (with pad) | Very low | Playfields, borders, all-season use |
| Poured-in-place rubber | Excellent | Minimal | Pro installs, ADA-accessible paths |
- Loose-fill materials need a contained edge, whether that’s landscape timber, plastic edging, or a shallow retaining wall, or they migrate onto the lawn within a few rainstorms.
- Grade the base slightly so water sheds away from the play zone instead of pooling under swings.
- Artificial turf handles the wear pattern under high-traffic zones better than natural grass, since it doesn’t develop bare, muddy ruts. If you’re weighing turf against loose fill for a playfield-style area, our playground turf installation guide breaks down padding requirements and drainage prep, and this guide to artificial turf characteristics covers general maintenance expectations.
Fitting Play Into Small Yards and Different Ages
A small yard doesn’t mean fewer options, just smarter stacking. Vertical elements (climbing walls mounted on a fence, a net strung between two posts) use footprint you’re already paying for. Corner zones tucked behind a shed or planting bed become natural play rooms without eating into open lawn.
- Toddlers (1 to 3 years): low balance beams, sandboxes, soft-surface crawl spaces, direct adult supervision at arm’s length.
- Preschool (3 to 5 years): low climbers, swings with bucket seats, mud kitchens, supervision within sight but not always arm’s reach.
- Early elementary (5 to 8 years): climbing nets, taller slides, loose-parts building zones, supervision from a distance with periodic check-ins.
- Mixed ages: use a low fence, planting bed, or change in surfacing material as a visual boundary between the toddler zone and anything with more height or speed.
Budget DIY Builds and What to Watch For
Pallet forts, stacked tires, and hollowed stumps make great free or near-free play features, provided you sand rough edges, check tires for steel belting before letting kids climb inside, and treat wood to prevent splinters. Keep loose-fill surfacing contained with simple timber or plastic edging set slightly below grade so it doesn’t wash out. Community groups like Buy Nothing are a solid source of free stumps, tires, and lumber, just inspect everything for rot, rust, or sharp hardware before it lands in your yard.
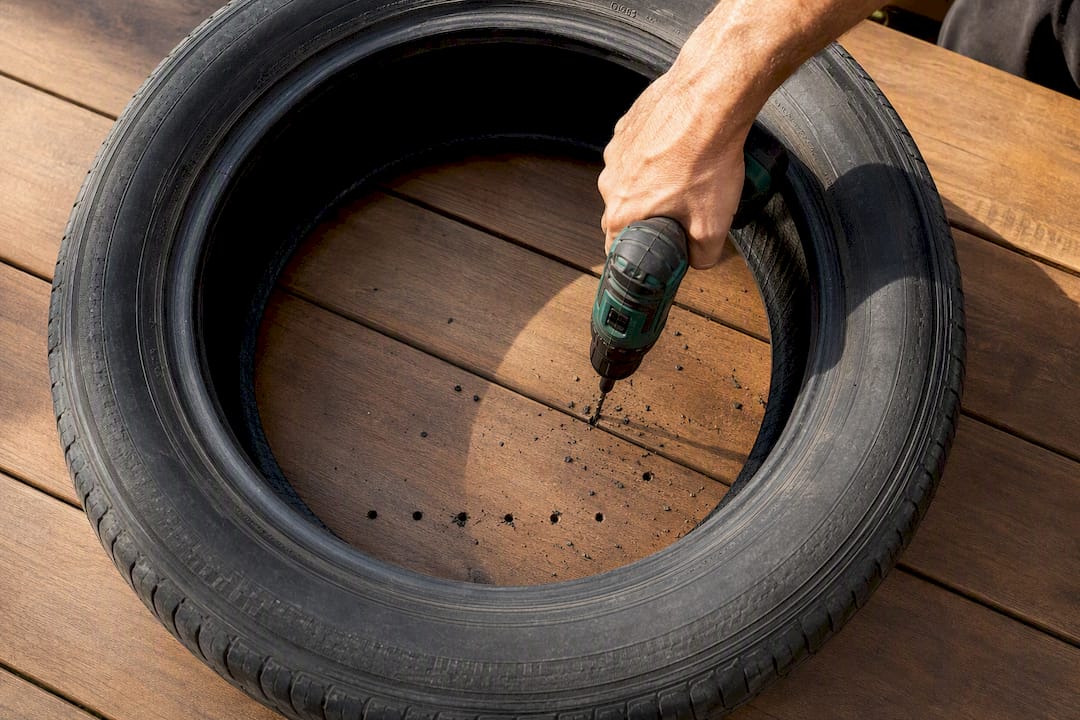
Pro Tip: A tire that’s been sitting outside for years can trap water and mosquitoes inside the rim. Drill a few drainage holes in the bottom before it becomes a play feature.
Keeping the Play Area Safe Season After Season
Surfacing settles, compacts, and washes away faster than most homeowners expect, so a quick seasonal check keeps small problems from becoming safety issues.
- Monthly: rake loose-fill surfacing to redistribute depth, especially under swings where kids’ feet drag it thin.
- Twice a year: measure surfacing depth against the manufacturer’s minimum and top up engineered wood fiber or rubber mulch as needed.
- After heavy rain: check for washout at edges and low spots where water pools instead of draining.
- Annually: inspect containment edging for gaps and re-grade any low spots that have developed.
- Call a professional when drainage problems persist despite re-grading. That usually points to a grading or drain tile issue underneath the yard, not just the surfacing on top.
How Trew Landscape LLC Approaches Backyard Play Design
Play equipment doesn’t exist in isolation. It sits inside a yard with drainage patterns, slope, and sightlines that determine whether that surfacing stays put through a Kansas City spring. We treat a play area as part of the whole site plan, not a separate project bolted onto the lawn.
DIY works well for loose parts, sandboxes, and smaller builds. Grading, drainage tile, and turf installation are where professional work pays off, because a play zone built on the wrong grade will keep washing out no matter how often you re-edge it.
— Trew Landscape LLC
Get Professional Help With Site Prep and Surfacing
Professional landscapers handle the parts of a backyard play area that are hardest to get right on your own: grading for drainage, durable containment edging, and turf installation that holds up to years of kids running the same path. If your yard slopes toward the house or holds water after storms, that’s a site-planning problem no amount of surfacing depth will fix on its own.

A consultation covers your yard’s slope, drainage, and sun exposure, then maps out where a play zone, turf area, or drain tile installation fits into the bigger picture. For sloped or uneven yards, our sloped backyard grading solutions address the drainage issues that undermine surfacing before it ever gets used. If turf is on your list for a durable playfield, start with a landscape design consultation so drainage, edging, and turf get planned together instead of patched after the fact.
Where to Verify Safety Guidance
- CPSC Outdoor Home Playground Safety Handbook: official spacing, surfacing, and equipment guidance.
- Systematic review on nature-based play and child development: research backing for nature-forward design choices.
Sources
- Outdoor Home Playground Safety Handbook - CPSC Publication 324
- Nature-based play and children’s development (systematic review) - PMC
- Nature-based play and learning literature review (2024 update)
FAQ
How Far Should Surfacing Extend Beyond Play Equipment?
CPSC guidance calls for shock-absorbing surfacing to extend at least 6 feet beyond the equipment’s perimeter in every direction, with extra distance in front and back of swings.
Is Artificial Turf Safe Under Play Equipment?
Artificial turf can work as a surface layer when installed with proper cushioning underneath, and it holds up better than natural grass under heavy foot traffic. Loose-fill materials like engineered wood fiber or rubber mulch remain the most tested option directly under climbers and swings.
What’s the Cheapest Way to Start a Backyard Play Area?
Loose-parts play, mud kitchens, and stump or log balance beams cost the least, since they use found or low-cost materials and require no manufactured equipment.
How Do I Keep Loose-Fill Surfacing From Washing Away?
Install a contained edge with landscape timber or plastic edging set slightly below grade, and re-grade any low spots where water collects after rain.
Do Nature-Based Play Features Actually Benefit Kids?
Research reviews report that nature-based play supports longer, more varied play episodes and greater physical activity compared to fixed manufactured equipment alone.